Craving a decadent dessert without the fuss? This no-bake cheesecake heaven is an easy and quick homemade treat made with creamy cheese and a graham cracker crust, perfect for a weeknight dinner. Save for later and indulge in its richness tonight.
No-Bake Cheesecake Heaven
Introduction
Imagine a dessert so divine, it’s like a slice of heaven on a plate. Welcome to the world of No-Bake Cheesecake Heaven, where creamy textures, rich flavors, and effortless preparation come together in perfect harmony. This masterpiece of a dessert is not only a treat for the taste buds but also a testament to the magic that can happen in the kitchen with everyday ingredients. Whether you’re a seasoned baker or a culinary newbie, this no-bake cheesecake is sure to impress with its simplicity, versatility, and downright deliciousness. So, let’s dive into the wonders of this dessert and explore what makes it a true culinary gem.
Why This Works
- Flavor balance and ingredient accessibility: The beauty of this no-bake cheesecake lies in its well-balanced flavors, achieved through a combination of cream cheese, sweetened condensed milk, and a touch of vanilla. These ingredients are not only readily available but also easy to work with, making this dessert accessible to everyone.
- Ease of preparation: One of the most appealing aspects of this recipe is its no-bake nature, which eliminates the need for tedious baking times and precise temperature control. This makes it perfect for hot summer days or for those who prefer to avoid the oven altogether.
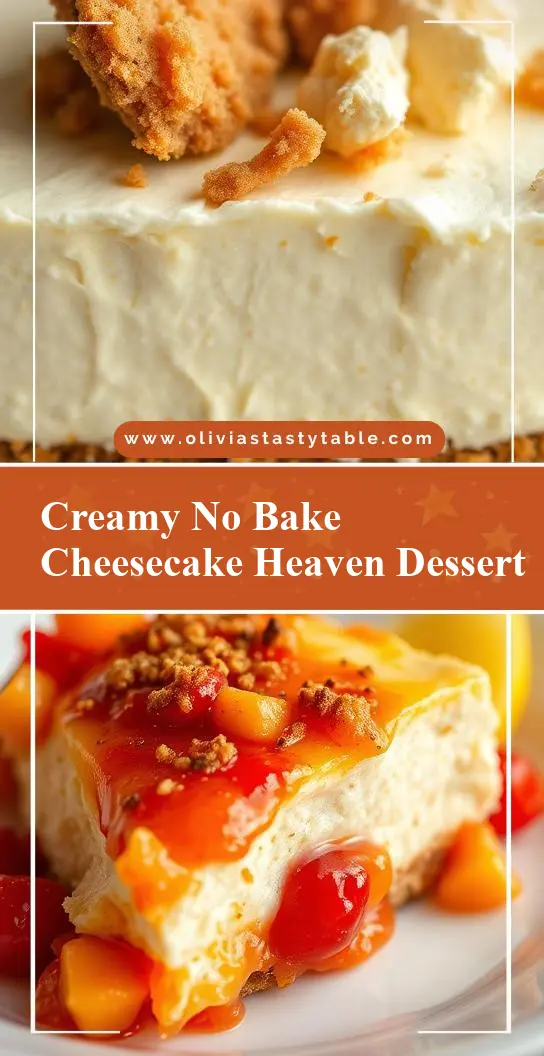
- Impressive results with minimal effort: Despite its simplicity, the No-Bake Cheesecake Heaven yields impressive results. The creamy cheesecake layer, coupled with a crunchy biscuit base and topped with a tangy fruit sauce, creates a dessert that looks and tastes like it was made in a professional bakery.
Key Ingredients
The success of this no-bake cheesecake hinges on a few key ingredients. First, you’ll need a packet of digestive biscuits for the base, which provides a nice crunch and a subtle flavor. For the cheesecake itself, cream cheese, sweetened condensed milk, and large eggs are essential. A teaspoon of vanilla extract adds depth, while a can of fruit (such as strawberries or blueberries) creates a delicious and healthy topping. Practical substitutions can be made for some ingredients; for example, using graham crackers instead of digestive biscuits or opting for a dairy-free alternative to cream cheese for those with dietary restrictions.
Instructions
- Step 1: Begin by preparing your ingredients. Crush the digestive biscuits in a food processor until they reach a fine crumb. Measure out the cream cheese, sweetened condensed milk, eggs, and vanilla extract. Open your can of fruit and set it aside for later use.
- Step 2: In a large bowl, mix the crushed biscuits with a small amount of melted butter until the mixture is well combined and holds its shape when pressed. Press this mixture into the bottom of a springform pan to create the base of your cheesecake. Refrigerate for about 10 minutes to set.
- Step 3: In another large bowl, beat the cream cheese until it’s smooth. Gradually add the sweetened condensed milk, beating continuously until well combined. Beat in the eggs one at a time, followed by the vanilla extract. Pour this cheesecake mixture over the prepared biscuit base and smooth the top. Refrigerate for at least 4 hours or overnight until set.
- Step 4: Once the cheesecake is set, remove it from the refrigerator about 30 minutes before serving to allow it to come to room temperature slightly. Top with the canned fruit and serve. You can also add additional toppings such as whipped cream, chopped nuts, or a drizzle of chocolate sauce to enhance the flavor and presentation.
Handy Tips
- When mixing the cheesecake batter, ensure that each egg is fully incorporated before adding the next to avoid a lumpy texture. Also, don’t overmix, as this can lead to a dense cheesecake.
- For a firmer cheesecake, you can add a tablespoon or two of unflavored gelatin to the cheesecake mixture before refrigerating it. This is especially helpful in warmer climates where the cheesecake might soften too much at room temperature.
- Experiment with different types of canned fruit or even fresh fruit to change up the flavor and look of your cheesecake. Pineapple, peaches, and mandarin oranges work beautifully and add a nice pop of color.
Heat Control
Since this is a no-bake cheesecake, the only heat control you’ll need to worry about is melting a small amount of butter for the biscuit base. Simply place the butter in the microwave for a few seconds until melted, or melt it gently in a saucepan over low heat, stirring occasionally. Be cautious not to overheat the butter, as it can quickly go from melted to burnt.
Crunch Factor
The crunch factor in this dessert comes from the biscuit base. To achieve the perfect crunch, ensure that the biscuits are finely crushed and well mixed with the melted butter. Pressing the mixture firmly into the springform pan also helps to create a solid base that holds its shape and provides a nice textural contrast to the creamy cheesecake.
Pro Kitchen Tricks
- To ensure that your cheesecake sets properly and doesn’t crack, avoid overmixing the batter and make sure the cheesecake cools and sets slowly in the refrigerator.
- For a smooth and even top, use a spatula or the back of a spoon to gently smooth out the cheesecake mixture after pouring it into the pan.
- Consider using a water bath if you were to bake a cheesecake, but since this recipe is no-bake, focusing on even refrigeration and not disturbing the cheesecake while it sets is key.
Storage Tips
- Leftover cheesecake can be stored in the refrigerator for up to 5 days. It’s best to keep it in an airtight container to prevent it from drying out.
- If you want to freeze your cheesecake, it’s best to do so without the fruit topping. Wrap the cheesecake tightly in plastic wrap or aluminum foil and place it in a freezer-safe bag. Frozen cheesecake can be stored for up to 2 months. Thaw overnight in the refrigerator before serving.
- When reheating or serving from chilled, allow the cheesecake to come to room temperature for about 30 minutes for the best flavor and texture.
Gift Packaging Ideas
This no-bake cheesecake makes a wonderful gift, especially during the holidays or for special occasions. Consider packaging it in a decorative tin or on a fancy cake stand. You can also add a personal touch by including a handwritten note or a small bag of gourmet coffee or tea. If you’re gifting just a slice, wrap it beautifully in cellophane or parchment paper and tie with a ribbon. Adding a few fresh flowers or a sprig of mint on top can also make it a visually appealing gift.
Flavor Variations
- 🌟 Different spices: Try adding a pinch of cinnamon, nutmeg, or cardamom to the cheesecake mixture for a unique twist on the classic recipe.
- 🌟 Creative toppings: In addition to canned fruit, consider using fresh berries, caramel sauce, chocolate shavings, or even a sprinkle of sea salt to top your cheesecake.
- 🌟 Ingredient swaps: For a lighter version, you could use less sweetened condensed milk or substitute some of the cream cheese with Greek yogurt. Experimenting with different types of biscuits for the base can also yield interesting flavor combinations.
Troubleshooting
- Texture problems: If your cheesecake turns out too soft, it might not have set properly. Try refrigerating it for a longer period. If it’s too dense, you might have overmixed the batter.
- Ingredient replacements: If you’re looking to replace the cream cheese, consider using a vegan cream cheese alternative or making your own by blending together cashews, lemon juice, and water.
- Over/undercooking signs: Since this cheesecake is no-bake, you won’t have to worry about overcooking. However, be aware that under-setting can happen if it’s not refrigerated long enough. A well-set cheesecake should be firm to the touch but still slightly yielding.
FAQs
- Can I freeze it? Yes, you can freeze the cheesecake, but it’s best to do so without any toppings. Wrap it tightly and store in a freezer-safe bag for up to 2 months.
- Is it gluten-free? Depending on the type of biscuits used for the base, this cheesecake can be gluten-free. Look for gluten-free biscuit options to make it accessible to those with gluten intolerance.
- Can I double the recipe? Yes, you can easily double the recipe to make a larger cheesecake. Just ensure you have a large enough springform pan and adjust the refrigeration time slightly, as a larger cheesecake might take a bit longer to set.
Conclusion
No-Bake Cheesecake Heaven is more than just a dessert; it’s an experience. With its creamy texture! its rich flavor, and its effortless preparation, it’s a treat that’s sure to delight both kids and adults alike. Whether you’re a seasoned chef or a beginner in the kitchen, this recipe is a must-try. So go ahead, get creative, and make this no-bake cheesecake your own. Share it with friends and family, or enjoy it all by yourself (we won’t judge). Happy baking, or should we say, happy no-baking!