Can you resist the charm of sweet treats like easy homemade fudge made with simple ingredients and a quick cooking method? This dreamy cotton candy fudge recipe is a family favorite, perfect for weeknights. Save for later and indulge in this tasty delight.
Dreamy Cotton Candy Fudge Recipe
Introduction
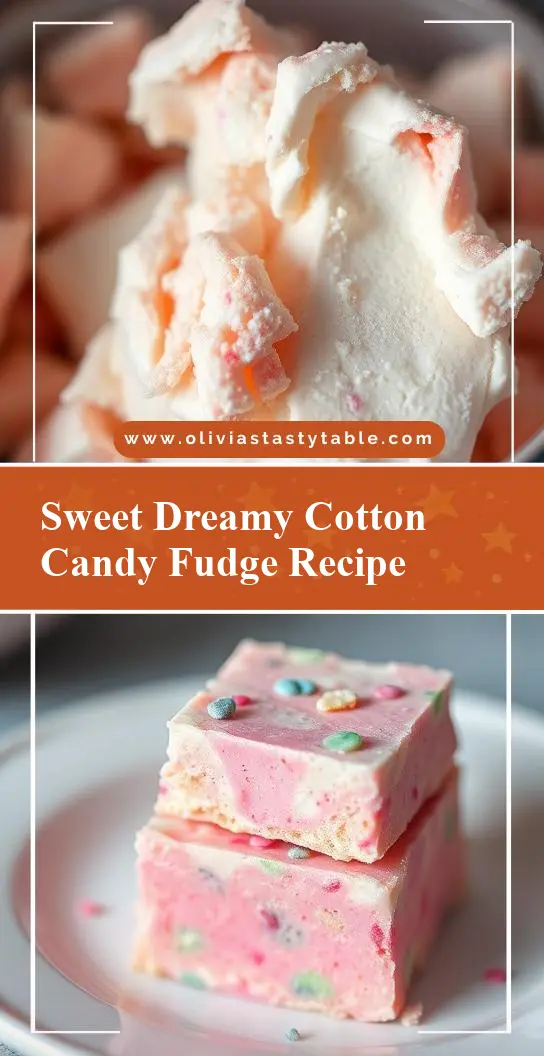
This Dreamy Cotton Candy Fudge Recipe is a sweet treat that combines the whimsy of cotton candy with the richness of fudge, all made easily with everyday ingredients. The best part? It’s incredibly simple to make, requiring minimal effort for a dessert that’s sure to impress both kids and adults alike. The creativity in this recipe comes from incorporating cotton candy into a traditional fudge recipe, giving it a unique flavor and texture that’s nothing short of magical. Whether you’re looking for a fun project to do with the family or a creative dessert to serve at your next gathering, this Dreamy Cotton Candy Fudge is sure to be a hit.
Why This Works
- Flavor balance and ingredient accessibility: The combination of sweet cotton candy and rich chocolate fudge creates a perfectly balanced flavor profile that’s both familiar and excitingly new. Plus, all the ingredients are easily found in most grocery stores, making this recipe accessible to everyone.
- Ease of preparation: The steps to make this fudge are straightforward and simple, requiring no special cooking skills or equipment beyond a microwave and a refrigerator.
- Impressive results with minimal effort: Despite its simplicity, the end result is a beautifully colored and uniquely flavored fudge that looks and tastes like it was made in a professional candy shop.
<
Key Ingredients
The main ingredients in this recipe include white chocolate chips, sweetened condensed milk, cotton candy, and food coloring. The white chocolate provides a creamy base, while the sweetened condensed milk adds sweetness and helps to bind the mixture together. The cotton candy is the star of the show, giving the fudge its distinctive flavor and color. Feel free to experiment with different flavors of cotton candy for unique variations. If you can’t find cotton candy, you could also try using cotton candy-flavored extract as a substitute, although the result might be slightly different.
Instructions
- Step 1: Begin by preparing your ingredients. Measure out 1 cup of white chocolate chips and 1 can of sweetened condensed milk. You’ll also need about 1 cup of cotton candy, which you can find at most candy stores or online.
- Step 2: In a large microwave-safe bowl, combine the white chocolate chips and sweetened condensed milk. Microwave on high for 30-second intervals, stirring between each interval, until the mixture is smooth and the chocolate is fully melted.
- Step 3: Once the chocolate mixture is ready, stir in the cotton candy. You’ll notice the mixture start to take on the color and flavor of the cotton candy. If you want a stronger cotton candy flavor, you can add a bit more, but be careful not to add too much or the fudge might become too sweet.
- Step 4: Pour the fudge mixture into a lined or greased 8-inch square baking dish. Refrigerate for at least 2 hours or until the fudge is set. Once set, remove from the refrigerator and cut into small squares. You can decorate the top with additional cotton candy or sprinkles for extra flair.
Handy Tips
- Make sure to use high-quality white chocolate for the best flavor. If you find the fudge too sweet, you can reduce the amount of sweetened condensed milk slightly in future batches.
- Avoid overheating the chocolate mixture, as this can cause it to seize up and become grainy. If you’re not using a microwave, you can also melt the chocolate over a double boiler on the stovetop.
- Experiment with different colors and flavors of cotton candy to create unique variations of the fudge. For example, using blue raspberry cotton candy could give your fudge a fun and fruity twist.
Heat Control
When melting the chocolate, it’s crucial to control the heat to avoid burning the chocolate or causing it to separate. If using a microwave, start with short intervals (30 seconds) and check the mixture, stirring and returning it to the microwave as needed, until smooth. If melting over a double boiler, ensure the water does not boil and stir the chocolate frequently.
Crunch Factor
This Dreamy Cotton Candy Fudge is designed to be smooth and creamy, with the cotton candy adding a fun textural element. However, if you prefer a crunchier fudge, you could try adding some chopped nuts (like almonds or pecans) or even crushed cookies to the mixture before it sets.
Pro Kitchen Tricks
- For a more vibrant color, use a high-quality food coloring or add a bit of colored extract to the mixture before adding the cotton candy.
- To prevent the fudge from becoming too sticky, make sure it’s fully set before cutting. If it’s still slightly soft, refrigerate for another 30 minutes to an hour.
- Clean up as you go to avoid the chocolate and cotton candy mixture hardening on your utensils and surfaces, making cleanup much easier.
Storage Tips
- Store the fudge in an airtight container in the refrigerator for up to 2 weeks. Let it come to room temperature before serving for the best flavor and texture.
- For longer storage, the fudge can be frozen. Wrap it tightly in plastic wrap or aluminum foil and place in a freezer-safe bag. Frozen fudge will keep for up to 3 months. Thaw frozen fudge in the refrigerator overnight before serving.
- When storing, keep the fudge away from strong-smelling foods, as it can absorb odors easily.
Gift Packaging Ideas
This fudge makes a wonderful gift, especially for those with a sweet tooth. Consider packaging it in decorative tins, jars, or even small gift boxes lined with parchment paper or colorful tissue paper. You can also wrap individual pieces in cellophane bags and tie with a ribbon for a more personalized touch. Adding a handwritten note or a small bag of extra cotton candy on top can make the gift even more special.
Flavor Variations
- 🌟 Different spices: Try adding a pinch of salt or a teaspoon of vanilla extract to the fudge mixture for added depth of flavor.
- 🌟 Creative toppings: Once the fudge is set, you can top it with a variety of creative toppings such as sprinkles, chopped nuts, shredded coconut, or even small pieces of candy.
- 🌟 Ingredient swaps: Experiment with different types of chocolate (like milk chocolate or dark chocolate) for a different flavor profile. You could also try using different flavors of extract (like peppermint or orange) for a unique twist.
Troubleshooting
- Texture problems: If your fudge turns out too soft, it may not have been refrigerated long enough. If it’s too hard, it might have been overheated. Adjust your melting time and refrigeration schedule accordingly for future batches.
- Ingredient replacements: If you can’t find certain ingredients, feel free to get creative with substitutions. However, keep in mind that changing ingredients can affect the final texture and flavor of the fudge.
- Over/undercooking signs: The fudge is ready when it’s set and comes away cleanly from the sides of the pan. If it’s still sticky or soft, it needs more refrigeration time. If it’s hard and grainy, it might have been overheated during the melting process.
FAQs
- Can I freeze it? Yes, the fudge can be frozen for up to 3 months. Wrap it tightly and thaw in the refrigerator overnight when you’re ready to serve.
- Is it gluten-free? This recipe does not contain gluten, making it suitable for those with gluten intolerance or sensitivity. However, always check the ingredients of your specific brands of chocolate and sweetened condensed milk to ensure they are gluten-free.
- Can I double the recipe? Yes, you can easily double or even triple this recipe if you’re making it for a large group. Just be sure to use a larger baking dish to accommodate the increased volume of fudge.
Conclusion
Making the Dreamy Cotton Candy Fudge is a fun and rewarding process that yields a deliciously unique dessert perfect for any occasion. With its easy preparation, impressive results, and room for creativity, this recipe is sure to become a favorite. Don’t be afraid to experiment with different flavors and toppings to make it your own, and enjoy sharing it with friends and family. Whether you’re a seasoned chef or a beginner in the kitchen, this fudge is sure to bring a smile to everyone’s face. So go ahead, get creative, and indulge in the whimsy of cotton candy fudge!